
Photo Studio
A clothing pack sells on its screenshots. The Photo studio turns your items into clean, consistent store shots, ready for your store page, CFX thread or Discord, straight out of the tool. It uses the live 3D preview, so the shot has the same lighting, backdrop and ped as the viewport, and the viewport stays as you left it.
Opening it
- Click the camera icon on the 3D preview bar (Save a photo of the model).
- Or open it on a saved outfit: Appearance → Outfit → Photo studio, or Photo in the outfit dresser. See Appearance Menu.
Taking a photo
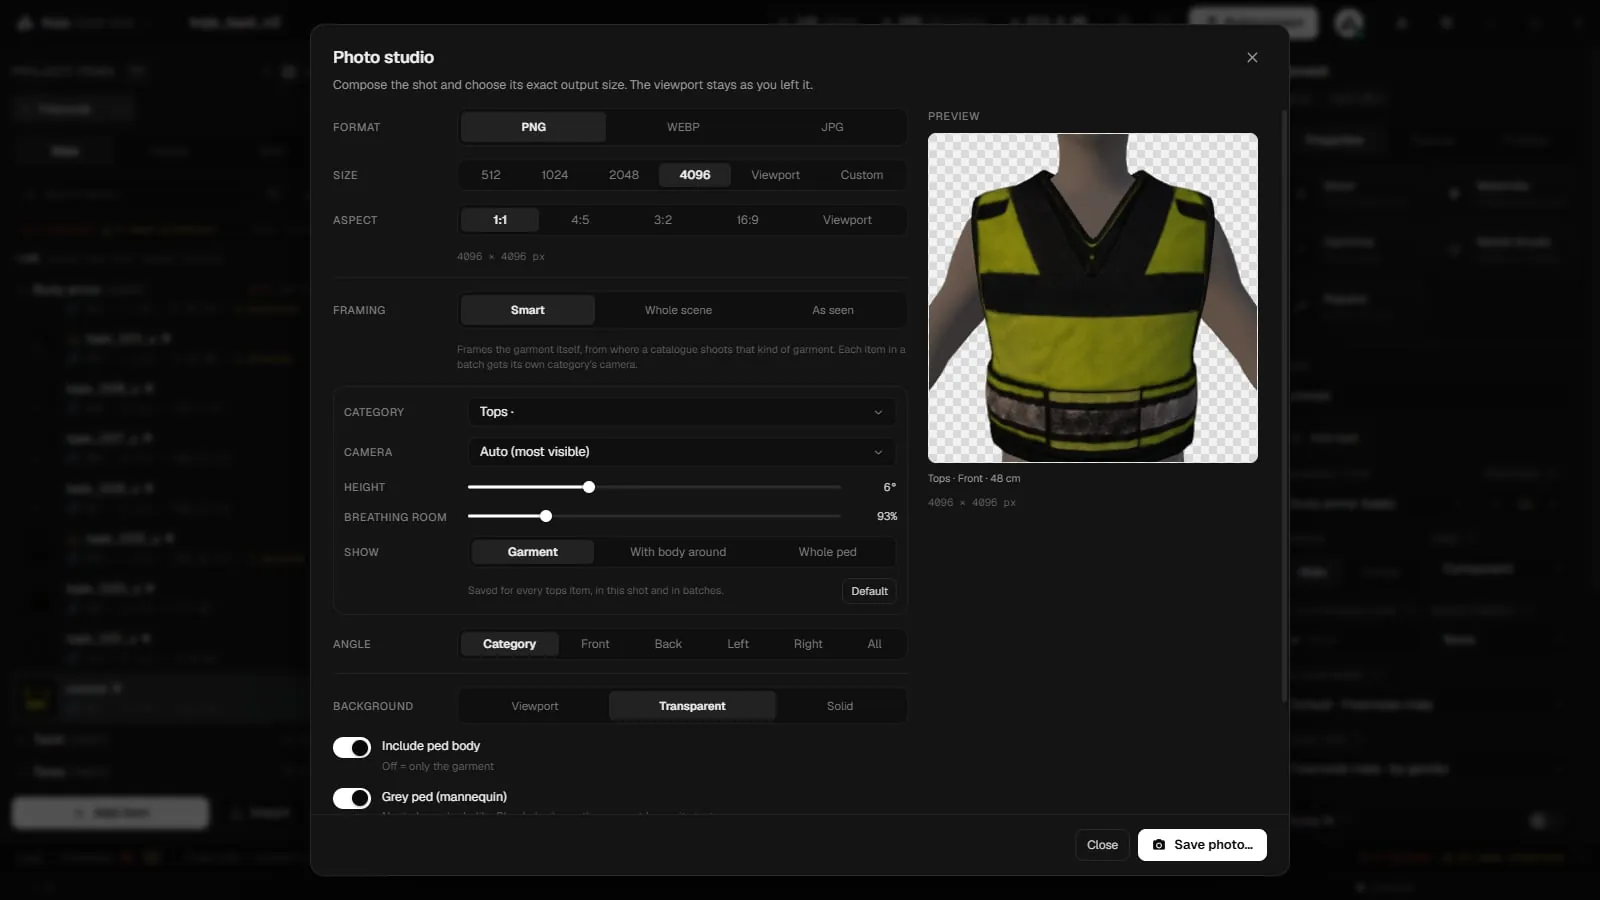
-
Pick the output
Choose the Format, Size and Aspect. -
Frame the shot
Choose the Framing and Angle. The Preview on the right shows what the shutter will take, over the background it will be saved on. -
Choose the background
Pick Background, and whether to include the ped. -
Save
Click Save photo… and choose where to save it.
Output
| Setting | Options |
|---|---|
| Format | PNG, WEBP or JPG. WEBP and JPG have a Quality slider; PNG is lossless. |
| Size | 512, 1024, 2048 or 4096 pixels, the Viewport size, or Custom Width and Height. |
| Aspect | 1:1, 4:5, 3:2, 16:9 or the Viewport's. |
The output size in pixels is shown under the settings. If your graphics driver cannot render that large, the size is limited and the window says so.
Framing
New in 2.0.8: smart framing per garment type.
| Framing | What it does |
|---|---|
| Smart | Frames the garment itself, from where a catalogue shoots that kind of garment. |
| Whole scene | Centres the model and fits it to the shot, whatever the viewport shows. Margin sets the space around it. |
| As seen | Shoots exactly what the viewport shows. |
With Smart, a panel lets you adjust the camera for the garment's Category: Tops, Legs, Shoes, Hats & hair, Masks, Glasses, Earrings, Watches & bracelets, Gloves or Other. The category is detected from the item; you can pick another.
| Control | What it does |
|---|---|
| Camera | The angle the category is shot from. |
| Height | How high the camera sits. |
| Breathing room | How much space around the garment. |
| Show | Garment, With body around, or Whole ped. |
Your changes are saved for every item of that category, in single shots and in batches. Default puts the category's camera back. If the ped is posed by an animation, smart framing frames the whole scene instead.
Angle shoots from the framing's own angle (Category with Smart, Current otherwise), Front, Back, Left, Right, or All. All saves four files per shot, named _front, _back, _left and _right.
Background and ped
| Setting | What it does |
|---|---|
| Background | Viewport (the preview's backdrop), Transparent, or Solid with a colour (white, black, light grey or your own). JPG has no transparency. |
| Include ped body | Off shoots only the garment. |
| Grey ped (mannequin) | A neutral grey body, like Blender's clay. The garment keeps its textures. New in 2.0.8. |
While the Photo studio is open, the viewport behind it shows the grey mannequin too, so you see what the shot will have.
Photographing every item
Photograph every item… shoots every item in the project with the settings above, into a folder you choose. Each item gets its own category's camera when framing is Smart. Prefix adds text before every file name. The button shows progress and Stop ends the batch.
The batch is not offered when the studio is open on an outfit.